How to Build Seat-Based Billing with Stripe Checkout
In this tutorial, we’ll show you how to integrate seat-based billing into your existing app with Stripe Checkout. We’ll build this with Node.js and Express for the backend, utilizing Stripe’s hosted checkout interface. You’ll learn how to set up Stripe products, implement the checkout process, and manage seats in your application after successful purchases.
Overview
What you’ll build:
- A seat-based billing system where users can subscribe to plans and dynamically adjust seat quantities.
- A Stripe Checkout integration for secure payment processing.
- Automatic seat provisioning with proration for adding and removing seats mid-cycle.
Step 1: Set Up Stripe Products
1.1 Create a Product in Stripe
- Log in to your Stripe Dashboard.
- Navigate to Products > Add Product.
- Fill in the product details:
- Name: Enter a descriptive name for your product (e.g., “Standard” or “Pro Subscription”).
- Description (optional): Provide a brief description of the product.
- Pricing Model: Select Recurring for ongoing billing (e.g., monthly or yearly).
- Set the amount and unit pricing:
- Click More pricing options to define the pricing details.
- Use Per unit pricing to charge based on the number of seats.
- Set the cost per seat (e.g., $4 per seat/month).
- Save the product by clicking Add product.
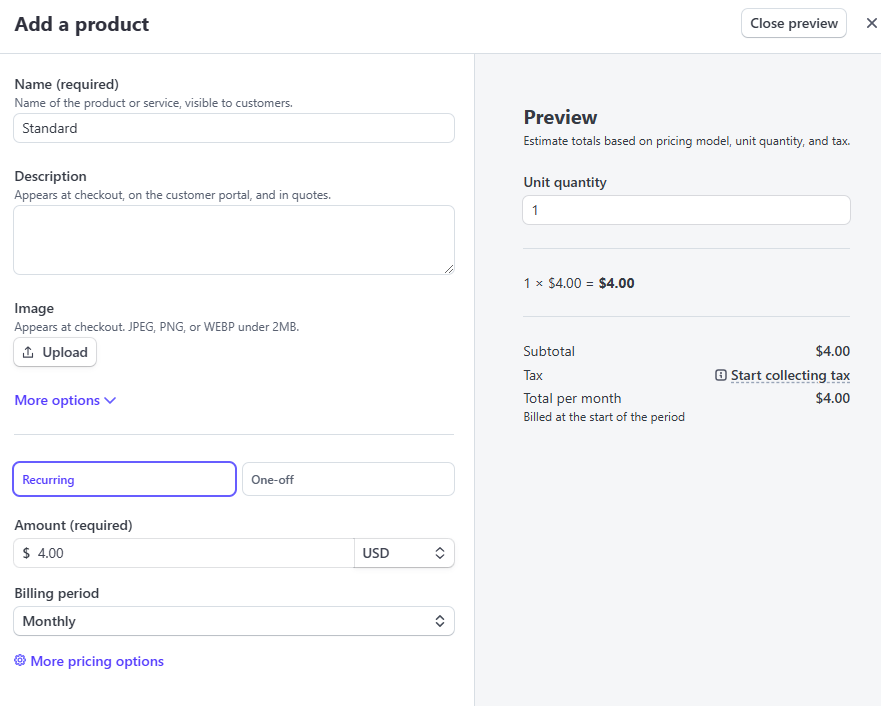 Screenshot of the Stripe Dashboard with the “Add Product” form filled out, showing the product name, recurring billing, and pricing details.
1.2 Note Your Product Price ID
Once saved, copy the Price ID (e.g., price_1HkZsJGfP2xD), which will be used in your code. 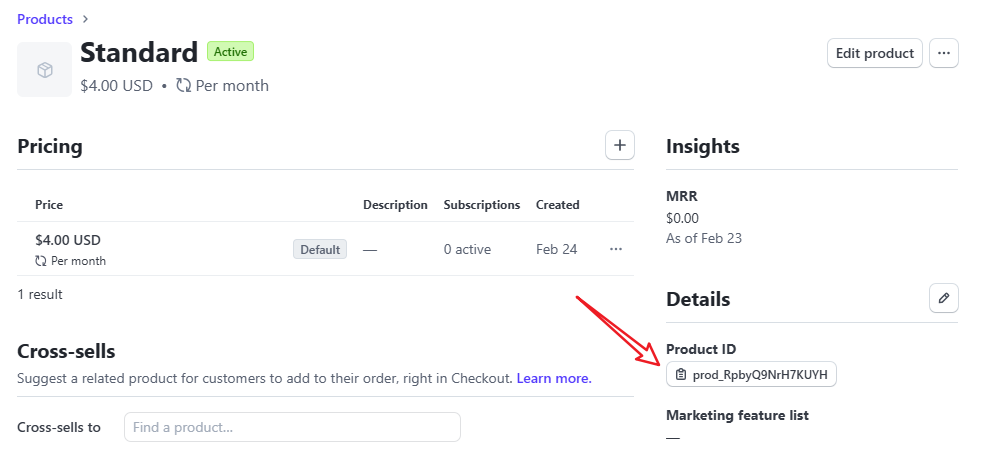 Screenshot of the Stripe Price ID shown in the product details page after saving.
Step 2: Project Directory Structure
Here’s what each file and directory contains:
.env: Stores environment variables for API keys and configurationpackage.json: Contains Node.js project metadata and dependenciesserver.js: The main Express server file for the backendnode_modules/: Houses all installed npm packagesREADME.md: Project documentation file
1
2
3
4
5
6
stripe-seat-billing/
├── .env                    # Environment variables
├── package.json           # Node.js dependencies
├── server.js             # Backend Express server
├── node_modules/         # Installed packages
└── README.md
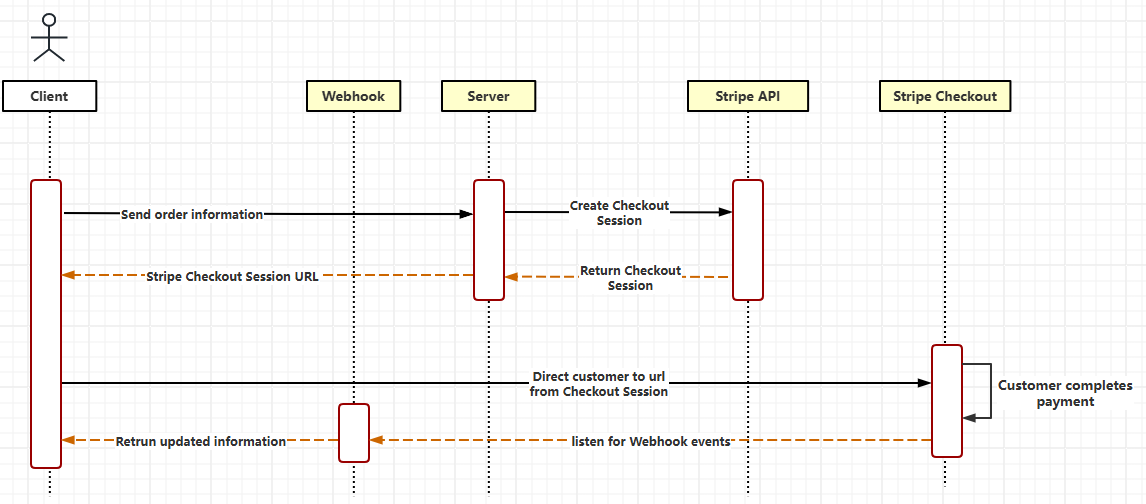 architectural diagram showing different components and how they are working together.
Step 3: Leverage Stripe Customer Portal
To simplify seat adjustments, you can enable Stripe’s Customer Portal. This allows users to manage seat quantities directly without custom API implementations.
3.1 Enable Customer Portal
- Go to your Stripe Dashboard → Settings → Customer Portal.
- Enable Adjust Quantities for subscriptions.
- Provide a portal link to your customers.
Benefits:
- Reduces backend complexity.
- Ensures a secure and user-friendly experience for customers.
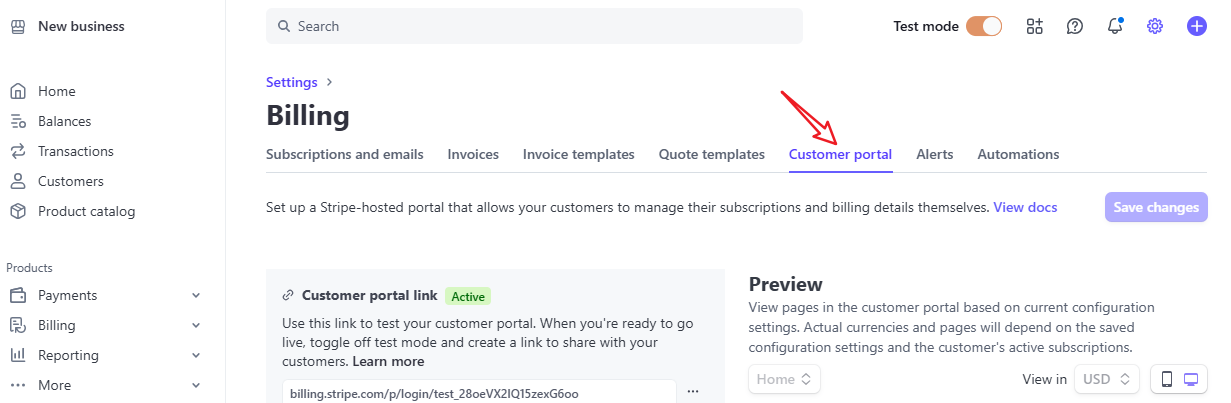 Screenshot of Stripe Customer Portal settings
Step 4: Add Stripe Checkout to Your Backend
You’ll need a backend server to handle Stripe Checkout sessions safely. Here’s why:
- Your customers’ payment info stays secure and you can be sure no one messes with your pricing
- Your Stripe secret keys stay hidden from prying eyes on the frontend
- You can keep tabs on all your transactions and manage subscriptions properly
- Payments and user data updates happen in a secure environment
- Every transaction gets double-checked before going through
4.1 Set Up Your Backend Server
Let’s set up a simple Node.js server using Express.js as our web framework. We’ll need these essential dependencies: Stripe for payment processing, dotenv for managing environment variables, and body-parser for handling request data:
1
2
3
mkdir stripe-seat-billing && cd stripe-seat-billing
npm init -y
npm install express stripe dotenv body-parser
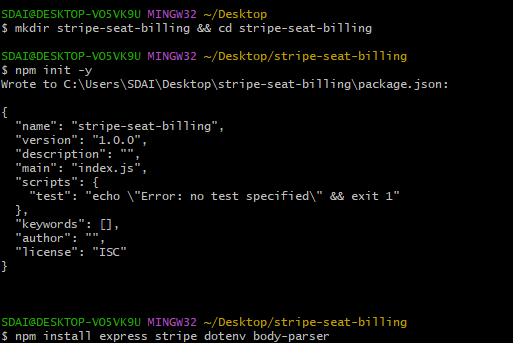 Terminal screenshot showing the project setup commands and installed packages.
4.2 Configure Environment Variables
Create a .env file in your project’s root directory to securely store sensitive configuration values and add:
1
2
3
STRIPE_SECRET_KEY=sk_test_your_secret_key
DOMAIN=http://localhost:3000
4.3 Implement Stripe Checkout for Subscription Creation
Create a new file calledserver.jsin your project’s root directory and add the following code:
1
2
3
4
5
6
7
8
9
10
11
12
13
14
15
16
17
18
19
20
21
22
23
24
25
26
27
28
29
30
31
32
const express = require('express');
const Stripe = require('stripe');
const dotenv = require('dotenv');

dotenv.config();
const app = express();
app.use(express.json());

const stripe = Stripe(process.env.STRIPE_SECRET_KEY);

app.post('/create-checkout-session', async (req, res) => {
    const { quantity } = req.body; // Number of seats

    try {
        const session = await stripe.checkout.sessions.create({
            payment_method_types: ['card'],
            line_items: [{
                price: 'price_YOUR_PRICE_ID', // Replace with your Stripe Price ID
                quantity: quantity,
            }],
            mode: 'subscription',
            success_url: `${process.env.DOMAIN}/success?session_id={CHECKOUT_SESSION_ID}`,
            cancel_url: `${process.env.DOMAIN}/cancel`,
        });

        res.json({ url: session.url });
    } catch (err) {
        res.status(500).json({ error: err.message });
    }
});

app.listen(3000, () => console.log('Server running on http://localhost:3000'));
The server.js code above sets up an Express server that handles Stripe Checkout integration. Note that all sensitive information, including the Stripe Secret Key, must always remain server-side for security. Let’s break down what this code does:
- Sets up the required dependencies (Express, Stripe, and dotenv)
- Creates an endpoint ‘/create-checkout-session’ that:
- Receives the requested number of seats
- Creates a new Stripe Checkout session with the seat quantity
- Returns a checkout URL to complete the purchase
- Configures the server to:
- Listen on port 3000
- Process incoming POST requests for checkout sessions
- Direct users to Stripe’s secure checkout page, with success_url and cancel_url handling the redirect flow based on whether the payment succeeds or is cancelled
Once the checkout is complete, Stripe redirects users to your success_url, including their unique session ID.
4.4 Seat Provisioning (Add or Remove Seats)
4.4.1 Add Seats Mid-Cycle
When a user adds seats mid-billing cycle, Stripe prorates the cost for the additional seats for the remaining days in the cycle.
Backend Code to Update Seats:
1
2
3
4
5
6
7
8
9
10
11
12
13
14
15
16
app.post('/update-seats', async (req, res) => {
    const { subscriptionId, quantity } = req.body;

    try {
        const subscription = await stripe.subscriptions.update(subscriptionId, {
            items: [{
                id: 'subscription_item_id', // Replace with your Subscription Item ID
                quantity: quantity, // Total number of seats after the update
            }],
        });

        res.json(subscription);
    } catch (error) {
        res.status(500).json({ error: error.message });
    }
});
4.4.2 Remove Seats
When a user reduces the number of seats in a subscription, the change typically takes effect at the start of the next billing cycle. This avoids refunding already-paid amounts for the current cycle.
Behavior for Removing Seats
- Stripe schedules the new seat count to begin with the next invoice.
- The user continues to have access to the current number of seats for the remainder of the cycle.
Backend Code to Remove Seats
You can schedule a seat reduction by updating the subscription’s quantity:
1
2
3
4
5
6
7
8
9
10
11
12
13
14
15
16
17
18
19
20
21
22
23
24
app.post('/remove-seats', async (req, res) => {
    const { subscriptionId, removeSeats } = req.body;

    try {
        const subscription = await stripe.subscriptions.retrieve(subscriptionId);
        const currentQuantity = subscription.items.data[0].quantity;

        if (removeSeats >= currentQuantity) {
            return res.status(400).json({ error: 'Cannot remove more seats than currently allocated.' });
        }

        const updatedSubscription = await stripe.subscriptions.update(subscriptionId, {
            items: [{
                id: subscription.items.data[0].id, // Subscription item ID
                quantity: currentQuantity - removeSeats,
            }],
        });

        res.json(updatedSubscription);
    } catch (error) {
        res.status(500).json({ error: error.message });
    }
});
4.4.3 Key Differences Between Adding and Removing Seats
| Action | Timing | Proration | Example |
|---|---|---|---|
| Add Seats | Takes effect immediately. | Prorated charge is applied. | User adds 2 seats mid-cycle, charged for remaining days. |
| Remove Seats | Takes effect at the next billing cycle. | No proration (scheduled). | User removes 2 seats, new quantity begins with the next invoice. |
4.4.4 Webhook Handling for Seat Adjustments
When you update a subscription, Stripe triggers the following webhook events:
customer.subscription.updated: Sent whenever the subscription’s quantity changes.invoice.updated: Sent for proration adjustments when seats are added mid-cycle.
Webhook Example
Ensure your backend listens to these events to keep your system in sync with Stripe:
1
2
3
4
5
6
7
8
9
10
11
12
13
14
15
16
17
18
19
20
21
22
23
24
25
26
app.post('/webhook', express.raw({ type: 'application/json' }), (req, res) => {
    const sig = req.headers['stripe-signature'];
    let event;

    try {
        event = stripe.webhooks.constructEvent(req.body, sig, process.env.STRIPE_WEBHOOK_SECRET);
    } catch (err) {
        return res.status(400).send(`Webhook Error: ${err.message}`);
    }

    switch (event.type) {
        case 'customer.subscription.updated':
            const subscription = event.data.object;
            console.log(`Subscription updated: ${subscription.id}`);
            break;
        case 'invoice.updated':
            const invoice = event.data.object;
            console.log(`Invoice updated with proration: ${invoice.id}`);
            break;
        default:
            console.log(`Unhandled event type: ${event.type}`);
    }

    res.json({ received: true });
});
Step 5: Test Your Integration
5.1 Create the Subscription
This test verifies that your initial subscription creation process works, including setting the seat quantity during the first Checkout Session.
Steps:
- Use your backend’s
/create-checkout-sessionendpoint:- Send a request with the number of seats (e.g.,
quantity: 5) to generate a Stripe Checkout Session URL. Example using
curl:1 2 3 4 5
bash Copy code curl -X POST http://localhost:3000/create-checkout-session \ -H "Content-Type: application/json" \ -d '{"quantity": 5}'
- Send a request with the number of seats (e.g.,
- Open the generated Checkout URL in a browser:
- Verify that the Stripe Checkout Page shows the correct product and total price based on the number of seats.
- Complete the payment using a Stripe test card:
- For a successful payment, use:
4242 4242 4242 4242. - For a declined payment, use:
4000 0000 0000 9995.
- For a successful payment, use:
- After payment:
- Check the Stripe Dashboard > Payments to confirm the payment is successful.
- Check the Stripe Dashboard > Subscriptions to verify:
- The subscription was created.
- The correct seat quantity is reflected.
5.2 Add Seats
This test ensures that adding seats mid-billing cycle works correctly and that proration charges are applied.
Steps:
- Go to the Customer Portal for a test customer with an active subscription.
- Add seats to the subscription:
- Example: Increase from 5 seats to 8 seats.
- Verify the following in the Customer Portal:
- Proration charges are calculated correctly for the additional seats based on the remaining billing period.
- The updated total seat count is displayed.
- Check the Stripe Dashboard:
- Verify the updated subscription shows the correct seat count.
- Verify the Invoices section reflects the proration charge for the added seats.
5.3 Remove Seats
This test ensures that removing seats is scheduled correctly for the next billing cycle.
Steps:
- Go to the Customer Portal for a test customer with an active subscription.
- Remove seats from the subscription:
- Example: Decrease from 8 seats to 5 seats.
- Verify the following in the Customer Portal:
- A message confirms that the seat reduction will take effect at the start of the next billing cycle.
- The current billing period remains unaffected.
- Check the Stripe Dashboard:
- Verify the pending seat reduction is displayed in the subscription details.
- Verify the Invoices section does not include immediate changes for the removed seats.
5.4 Webhook Testing (Optional)
If your system relies on webhooks for updates, test the events triggered by the Customer Portal:
Use the Stripe CLI to listen for webhook events:
1
stripe listen --forward-to localhost:3000/webhook- Make seat adjustments in the Customer Portal (add or remove seats).
- Verify the webhook events:
customer.subscription.updated: Sent when seats are added or scheduled for removal.invoice.updated: Sent for proration charges when seats are added.
- Check your application logic:
- Ensure your backend processes these events and updates your database or app state accordingly.
Step 6: Deploy to Production
- Switch to Live Mode in Stripe by updating your API keys.
- Update webhook URLs in your Stripe Dashboard to point to your production server.
- Monitor subscriptions and seat adjustments in the Stripe Dashboard.
Summary
With this setup:
- Customers can subscribe to seat-based plans.
- Users can dynamically add or remove seats mid-cycle with prorated adjustments.
- Optional use of Stripe Customer Portal streamlines seat management.
For testing, ensure you validate proration charges, seat reductions, and webhook events to provide a seamless user experience.
For more advanced use cases, refer to Stripe’s official documentation.